Passport Photo Size Checker
Check Your Passport Photo Requirements
This tool verifies if your photo meets official passport size requirements. Enter your photo dimensions to check if your head size falls within the required 50-69% range.
Getting a passport photo right isn’t just about looking good-it’s about meeting strict government rules. One wrong shadow, the wrong background color, or a smile that’s too wide, and your application gets rejected. You don’t need to go to a photo studio. You can turn a normal photo into a passport photo at home, using just your phone and free tools. Here’s how to do it correctly, without wasting time or money.
Understand the official passport photo rules
Before you even take a photo, know what’s allowed. The U.S. Department of State, UK Home Office, Canada’s Passport Program, and most other countries follow similar standards. If you’re applying for a U.S. passport, these are the exact rules:- Size: 2 x 2 inches (51 x 51 mm)
- Head size: 1 to 1 3/8 inches (25 to 35 mm) from bottom of chin to top of head
- Background: Plain white or off-white, no patterns, shadows, or objects
- Expression: Neutral, mouth closed, no smiling
- Eyes: Open, clearly visible, no glare from glasses
- Attire: No uniforms, hats, or head coverings (unless for religious reasons, and even then, your full face must be visible)
- Lighting: Even, no shadows on face or background
- Photo age: Taken within the last 6 months
These rules aren’t suggestions-they’re enforced by automated systems. Even a tiny shadow under your chin can trigger an automatic rejection. So precision matters.
Take the photo the right way
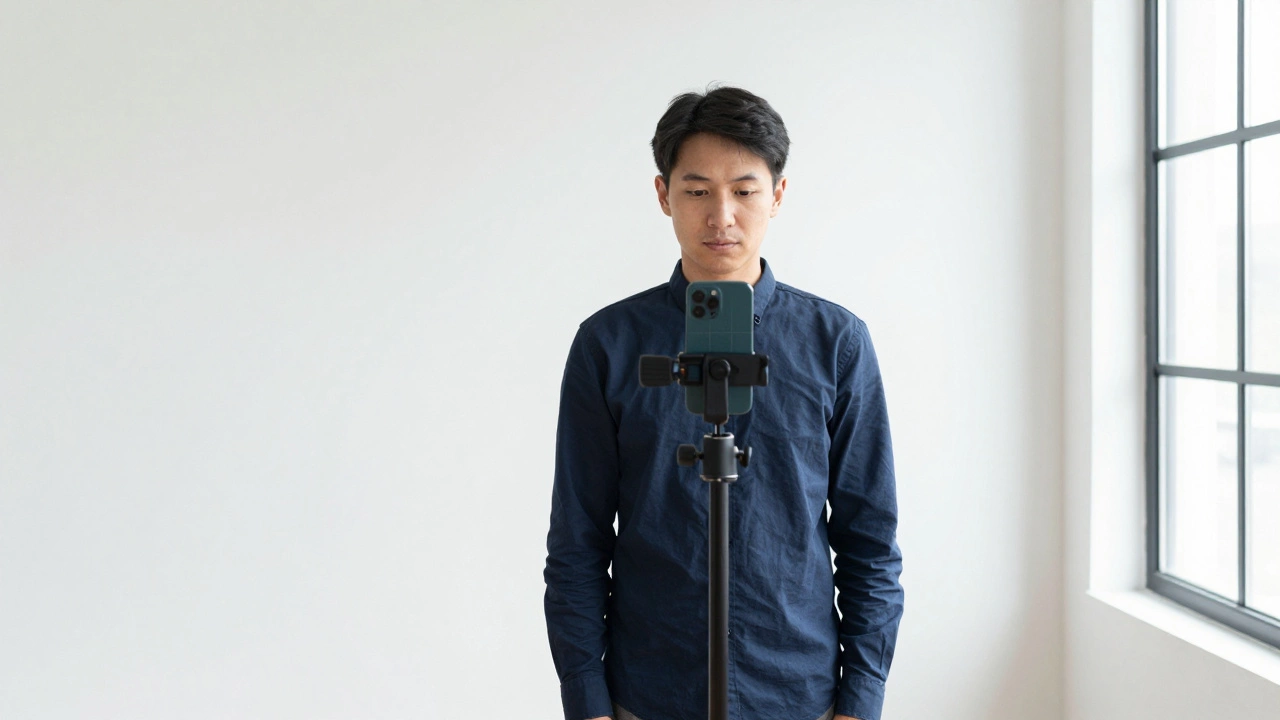
You can’t just snap a selfie and call it a passport photo. Here’s how to get it right on the first try:- Use a plain white or off-white wall as your background. Avoid curtains, furniture, or windows behind you.
- Stand 2 to 3 feet away from the wall. This helps avoid shadows.
- Use natural light. Face a large window, but don’t sit directly in sunlight. Overcast days work best.
- Use a tripod or prop your phone on a stack of books. Selfies taken at arm’s length often distort your face.
- Look straight into the camera. Your eyes should be level with the top of the frame.
- Wear normal clothing. No white shirts-they blend into the background.
- Take 5 to 10 photos in a row. Pick the best one later.
Pro tip: If you’re using a phone, turn on gridlines in your camera settings. This helps you center your face. Most phones have this under Settings > Camera > Grid.
Use free tools to crop and adjust your photo
Once you’ve got a good photo, you need to edit it. You don’t need Photoshop. Free tools work just fine:- Windows: Use the built-in Photos app. Open your image, click Edit & Create > Crop, then set the aspect ratio to 1:1 and adjust to fit the head size.
- Mac: Use Preview. Click Tools > Adjust Size, set width and height to 600 pixels each (this equals 2x2 inches at 300 DPI).
- iPhone: Use the Shortcuts app. Download the Passport Photo shortcut from the Gallery. It auto-crops, adjusts background, and checks head size.
- Android: Try Passport Photo Maker (free on Google Play). It has templates for over 100 countries.
- Online: Use Passport Photo Online or ID Photo AI. Upload your photo, they auto-correct lighting, background, and size.
Most of these tools let you preview the result before downloading. Look for a red box around your head-that’s the required head size. If it fits perfectly, you’re good.
Fix the background if it’s not white
If your background is slightly off-white, gray, or has shadows, you can fix it:- Use Remove.bg (free version works). Upload your photo, it removes the background automatically. Then download and add a white background using any free editor like Canva.
- In Photoshop or GIMP, use the Select Subject tool, then invert the selection and fill the background with #FFFFFF (pure white).
- On your phone, apps like PhotoDirector or Snapseed have Background Eraser tools. Use them carefully-don’t erase part of your hair or shoulders.
Important: Never use a blue or gray background, even if your country allows it. Many online systems reject non-white backgrounds automatically. Stick to white unless you’re applying in a country that explicitly allows off-white (like the UK).
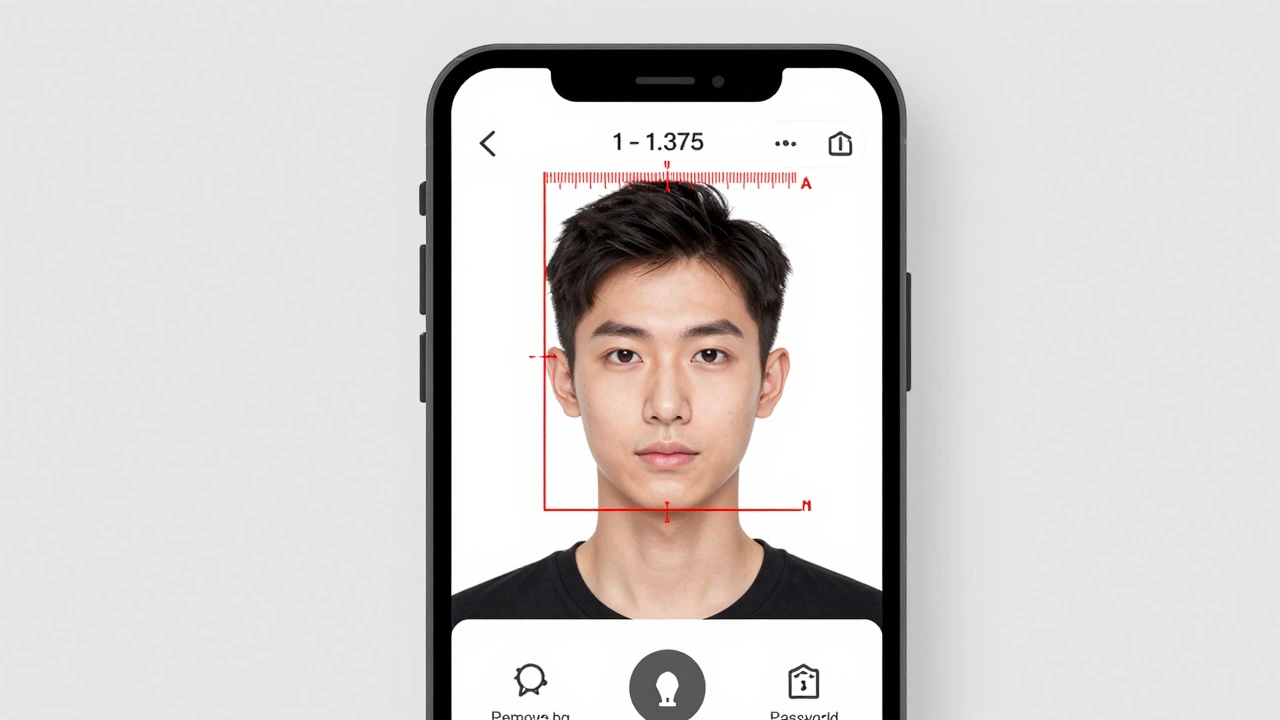
Check the head size and position
This is where most people fail. Your head must take up 50-69% of the photo’s height. Here’s how to check:- Download a passport photo ruler template from the U.S. Department of State website (search for “passport photo template PDF”).
- Print it at 100% scale (no scaling). Hold it up to your screen.
- Place the ruler over your photo. The top of your head should align with the top line. The bottom of your chin should align with the bottom line.
If you don’t have a printer, use a ruler app on your phone. Open Google’s Measure app (Android) or Measure on iPhone (iOS 12+). Place the phone next to your screen. Measure the photo’s height-it should be exactly 2 inches. Then measure from your chin to the top of your head-it must be between 1 and 1.375 inches.
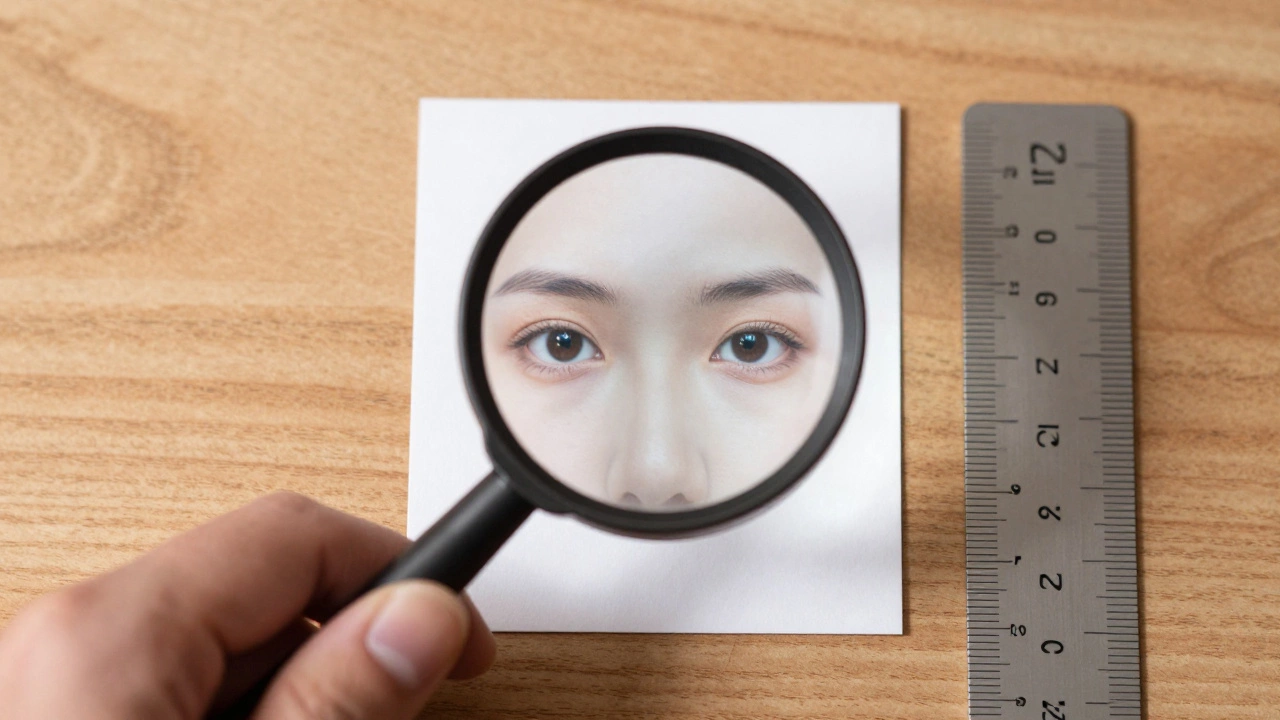
Test your photo before submitting
Before you upload your photo to your passport application, test it:- Print it on regular paper. Hold it up to a light. Can you see through the background? If it’s too dark or gray, it’s not pure white.
- Zoom in to 200%. Is your skin texture clear? Are your eyes fully visible? No pixelation or blur.
- Check for reflections. Glasses? No glare on the lenses. If you see white spots, adjust your lighting and retake.
- Ask someone else to look at it. If they say, “You look like you’re frowning,” or “Your head looks too small,” fix it.
Many people think their photo is fine-until it’s rejected. A quick double-check saves you weeks of waiting.
What to avoid at all costs
Here are the top 5 mistakes that get passport photos rejected:- Smiling or showing teeth - Neutral face only. Even a slight smile can be flagged.
- Wearing glasses with glare - Tilt your head slightly or remove them if possible.
- Wearing hats or head coverings - Even if you wear a hijab for religious reasons, your full face must be visible, and the covering must not cast shadows.
- Using a photo taken in front of a mirror - Reflections, angles, and lighting are never right.
- Using an old photo - Even if it’s 5 months old, if it’s not within the last 6 months, it’s invalid.
These aren’t “maybe” rules. They’re automated filters. One of these, and your application gets stuck in manual review-delaying your passport by 2-4 weeks.
When to use a professional service
If you’ve tried everything and still can’t get it right, don’t waste more time. Go to a pharmacy like CVS, Walgreens, or Rite Aid. They have passport photo kiosks. You get two printed copies for $15, and they guarantee approval. It’s faster than trying to fix a bad photo yourself.Same goes for post offices or travel agencies. They’re cheap, quick, and handle the technical stuff for you. If you’re in a hurry, this is the smartest move.
Final checklist before submitting
Before you hit submit on your passport application, run through this:- Photo is 2 x 2 inches
- Head size is between 1 and 1.375 inches
- Background is pure white
- No shadows on face or background
- Face is centered, eyes level
- Neutral expression, mouth closed
- No glasses glare
- Photo taken within the last 6 months
- Printed on matte or glossy photo paper (not regular printer paper)
If all these boxes are checked, your photo will pass. No exceptions.
Can I use a selfie for my passport photo?
No. Selfies taken with your phone held at arm’s length are almost always rejected. They create distortion-your nose looks bigger, your ears are cut off, and the lighting is uneven. Always use a tripod or have someone else take the photo from eye level.
Can I wear makeup in my passport photo?
Yes, but keep it natural. Heavy makeup, glitter, or contouring can change how your face looks and trigger rejection. The goal is to look like yourself, not a different version of yourself.
Do I need to wear a collared shirt?
No. There’s no rule requiring a collared shirt. You can wear any clothing, as long as it’s not a uniform, camouflage, or anything that blends into the white background. A plain T-shirt is perfectly fine.
Can I use a photo from my driver’s license?
No. Driver’s license photos don’t meet passport requirements. They’re often taken at different angles, with different lighting, and sometimes show a smile. Always take a new photo specifically for your passport application.
How many passport photos do I need to submit?
Most countries require one photo. But it’s smart to print two copies. Keep one as a backup in case the first one gets damaged or lost during processing. Some applications ask for two anyway.