Passport Photo Size Checker
Passport Photo Head Size Checker
Enter your photo dimensions and head height to verify if it meets the standard requirements. According to ICAO standards, your head should be 70-80% of the photo height.
1. Open your passport photo in any image viewer 2. Check the image properties or use 'Properties' in your OS 3. Find the height measurement (usually in pixels) 4. Measure from chin to top of head using the photo editor
Getting a passport photo right the first time saves you time, money, and stress. You don’t need a studio or a professional photographer. With a smartphone, a plain wall, and a few simple tools, you can take a passport-sized photo that meets official standards - no guesswork, no rejections.
Know the exact rules before you start
Every country has its own passport photo rules, but most follow the same basic guidelines set by the International Civil Aviation Organization (ICAO). For India, the U.S., Canada, the UK, and Australia, the core requirements are nearly identical:- Size: 35mm wide x 45mm high (1.38 x 1.77 inches)
- Head height: 70-80% of the photo, from chin to top of head
- Background: Pure white or off-white, no shadows or patterns
- Face: Full front view, eyes open, mouth closed, neutral expression
- No glasses, hats, or head coverings (unless for religious reasons, and even then, your full face must be visible)
- Lighting: Even, no glare on face or glasses, no shadows behind head
- Photo must be recent: taken within the last 6 months
These aren’t suggestions - they’re strict rules. A single shadow or a slightly tilted head can get your photo rejected. That means your application gets delayed, and you might miss a trip.
Gather what you need
You don’t need expensive gear. Here’s what you actually need:- A smartphone with a good rear camera (iPhone 11 or newer, Samsung Galaxy S20 or newer)
- A plain white or light gray wall (a white bedsheet taped flat works too)
- A chair or stool
- A ruler or measuring tape (optional, but helpful)
- A friend or family member to take the photo (you can’t take it yourself with a phone)
Don’t use a selfie. Selfies always look wrong - too close, too low angle, or with your nose dominating the frame. You need someone else to hold the phone at eye level.
Set up your background and lighting
Find a wall with no windows, no posters, no furniture in the background. Even a slight shadow behind your head will cause rejection. If your wall isn’t white, hang a clean white bedsheet over it and tape the edges tightly so it doesn’t wrinkle.Lighting is the biggest mistake people make. Don’t use overhead lights or flash. Natural light is best. Position yourself facing a large window - but not directly in front of it. The window should be to your side, slightly in front, so your face is softly lit. Avoid harsh sunlight - cloudy days are perfect. If it’s dark, use two soft lamps on either side of the camera, at eye level. No lamp should cast a shadow on your face.
Position yourself correctly
Sit on a chair, back straight, looking straight into the camera. Your eyes should be level with the center of the lens. The top of your head should be about 1 cm from the top edge of the frame. Your chin should be clearly visible, not hidden by your neck or collar.Keep your shoulders relaxed. Don’t tilt your head up, down, or sideways. No smiling. No frowning. Just a neutral, natural expression - like you’re waiting for someone to say “cheese” but you’re not quite sure if they will.
Remove your glasses if you can. If you must wear them, make sure there’s no glare on the lenses. Tilt your head slightly if needed, but keep your face flat. If you wear a headscarf for religious reasons, make sure your face is fully visible from the hairline to the chin.

Take the photo
Ask your helper to hold the phone at eye level, about 1.5 meters (5 feet) away. Use the rear camera - it’s sharper than the front one. Turn on gridlines in your camera settings so you can align your head properly. The top of your head should line up with the top gridline. Your shoulders should fit between the left and right gridlines.Take multiple shots - at least 5. Don’t just snap one and call it done. Change your posture slightly, adjust the lighting, try again. Use the burst mode if your phone has it. You’ll get 10 photos in 2 seconds. Pick the one where your face is perfectly centered and the background is clean.
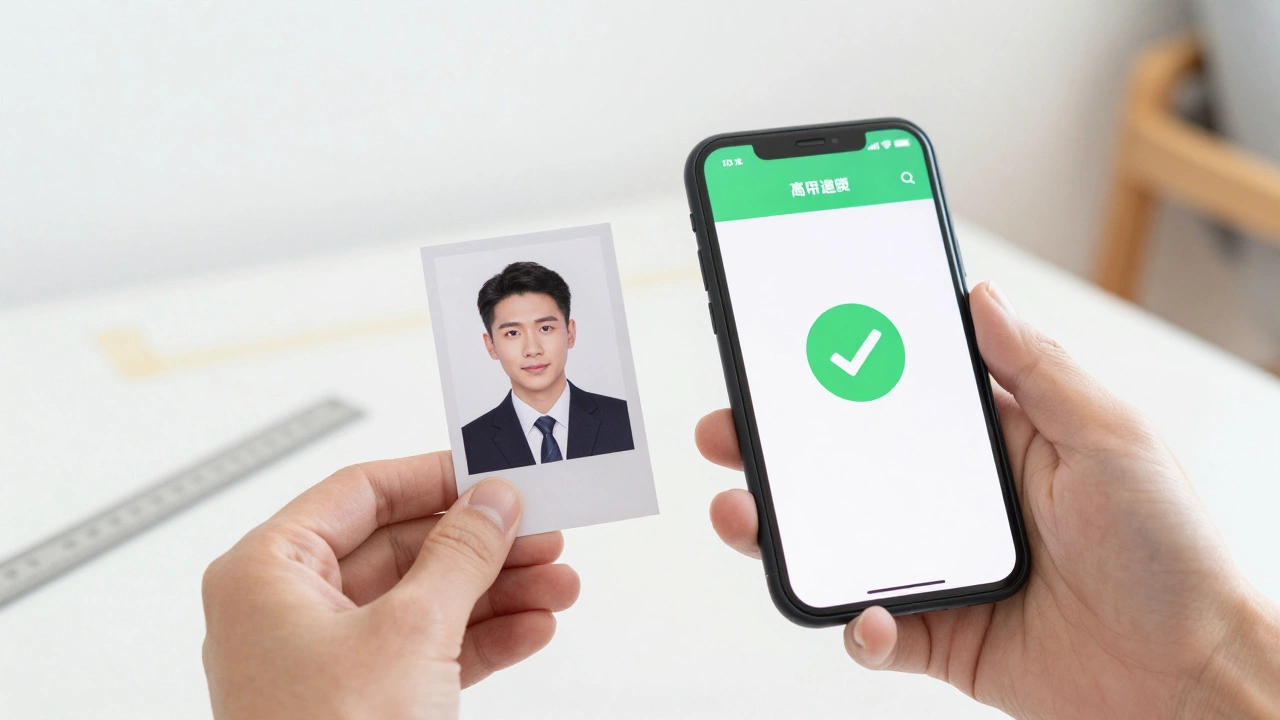
Check your photo before submitting
Use a free online tool like Passport Photo Online or IDPhoto4You to check your photo. Upload it, and the tool will tell you:- If your head size is correct
- If the background is too dark or patterned
- If there’s a shadow behind your head
- If your eyes are too closed or your mouth is open
These tools also crop the photo to the exact passport size and give you a printable version. You can download it as a PDF or JPEG. Print it on matte photo paper - not regular printer paper. Matte finish reduces glare under bright lights at immigration counters.
Common mistakes and how to avoid them
Here are the top 5 reasons passport photos get rejected - and how to fix them:- Shadows on the background - Move away from windows or bright lights behind you. Use a white sheet and soft, even lighting.
- Wearing glasses with glare - Take them off if possible. If not, adjust the angle of the light or your head.
- Too much space above the head - Get closer to the camera. Your head should fill 70-80% of the photo.
- Smiling or showing teeth - Relax your face. Think “calm,” not “happy.”
- Blurry or low-resolution photo - Use the rear camera. Don’t zoom in. Hold the phone steady.
One real example: A woman in Delhi submitted a photo where her hair was slightly touching the background. It was rejected because the system flagged it as a “pattern.” She used a white sheet, but the fabric had a faint weave. She switched to a plain white poster board - and got approved on the next try.
Print and submit
Print two copies on matte photo paper. Don’t use glossy - it reflects light and causes glare in scanned images. Cut them to size if needed (35mm x 45mm). Most photo printing kiosks in India (like those at Big Bazaar or Reliance Digital) have passport photo templates. Just upload your file and select “passport size.”Stick the photo on your application form with a glue stick - not tape. Tape can peel, and border marks can cause rejection. Some forms have a designated spot. If not, place it in the top right corner.
What if your photo gets rejected?
Don’t panic. Rejection isn’t rare - about 1 in 5 first-time DIY photos get turned down. If it happens, check the official rejection reason. Most government portals (like India’s Passport Seva) will tell you exactly why. Was it the background? The lighting? The expression? Fix that one thing, retake the photo, and try again.Many people try to fix rejected photos with apps like Photoshop or Canva. Don’t. Editing the background color or cropping too tightly can make it look fake. The system uses AI to detect manipulation. It’s better to retake the photo than to risk being flagged.
Final tip: Do it early
Don’t wait until the night before your appointment. Take your photo at least a week ahead. Test it with a friend. Print it. Hold it next to your ID card. Does it look like you? If yes, you’re good. If it looks like someone else, take another one.Passport photos are simple - but only if you follow the rules. No fancy gear. No studio. Just a wall, a phone, and attention to detail. Get it right once, and you’ll never have to do it again for the next 10 years.
Can I use a selfie for my passport photo?
No. Selfies are not accepted because they’re taken from below eye level, which distorts your face. Passport photos must show a straight-on view of your face, taken at eye level with someone else holding the camera. Selfies often show your chin too large and your forehead too small, which violates the head-size rules.
Can I wear makeup in my passport photo?
Yes, you can wear light, natural makeup - but only if it looks like your everyday appearance. Heavy contouring, bold lipstick, or dramatic eyeliner can make your face look different from how you appear in person. The photo must be a true representation of your face for identification purposes.
Do I need to wear a collared shirt?
No, there’s no rule requiring a collared shirt. You can wear any clothing as long as it’s not white (it blends with the background) and doesn’t cover your face. Avoid high necklines that hide your jawline. A simple T-shirt or blouse is fine.
Can I take a passport photo with my tablet?
Technically yes, but it’s not recommended. Tablets have lower-resolution cameras than modern smartphones, and their screens are harder to hold steady at the right distance. A smartphone with a good rear camera is the best tool for this job.
What if I wear a religious head covering?
You can wear a religious head covering if it’s part of your daily attire. But your full face must be visible - from the hairline to the chin, and both sides of your face must be clearly seen. No veil or fabric can obscure your features. Some countries require a signed declaration - check your government’s passport website for details.
Can I use a photo from my driver’s license as my passport photo?
No. Driver’s license photos are usually taken with different rules - often with a colored background, different lighting, or a different head size. Even if it looks like you, it won’t meet passport requirements. You must take a new photo specifically for your passport application.