Home Studio Budget Calculator
Set Up Your Studio Budget
Calculate your minimum budget based on your specific content needs and budget constraints
Your Minimum Budget
₹0- Lighting: ₹0
- Backdrop: ₹0
- Audio: ₹0
- Support Gear: ₹0
Tips from Mumbai Creators
"Priya from Andheri spent ₹12,000 total. She used a bedsheet backdrop and phone tripod. Start with just lighting + backdrop and add audio later."
Setting up a mini studio at home doesn’t need a big space, expensive gear, or a professional renovation. In Mumbai, where space is tight and budgets are tight too, thousands of photographers, content creators, and small business owners have turned balconies, spare rooms, and even corner nooks into working studios. You don’t need a 500-square-foot space. You need the right tools, smart planning, and a little creativity.
Start with the space you have
You don’t need a dedicated room. A 6x6 foot corner in your living room, a quiet balcony, or even a closet with good ventilation can work. The key is control. You want to block out natural light when you need to, and have enough room to move around your subject without bumping into furniture. In Indian homes, many people use the space near a window with a white curtain or bedsheet as a softbox. That’s not a hack-it’s a proven technique.
Paint the walls white or hang a seamless white backdrop. If you’re on a budget, use a plain white bedsheet or a roll of white wrapping paper taped to the wall. Avoid patterns, bright colors, or busy textures. Your background should disappear so the subject stands out.
Lighting: Your most important tool
Lighting makes or breaks your studio. Natural light is great, but it’s unpredictable. In India, sunlight changes drastically between 9 AM and 4 PM, and monsoon clouds can ruin your shoot in minutes. That’s why most home studios use artificial light.
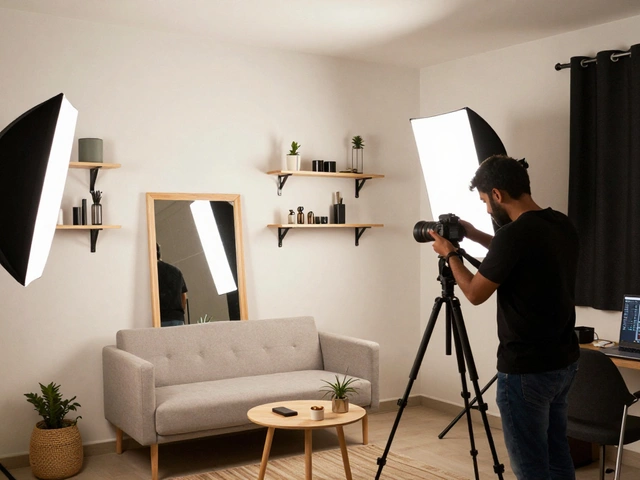
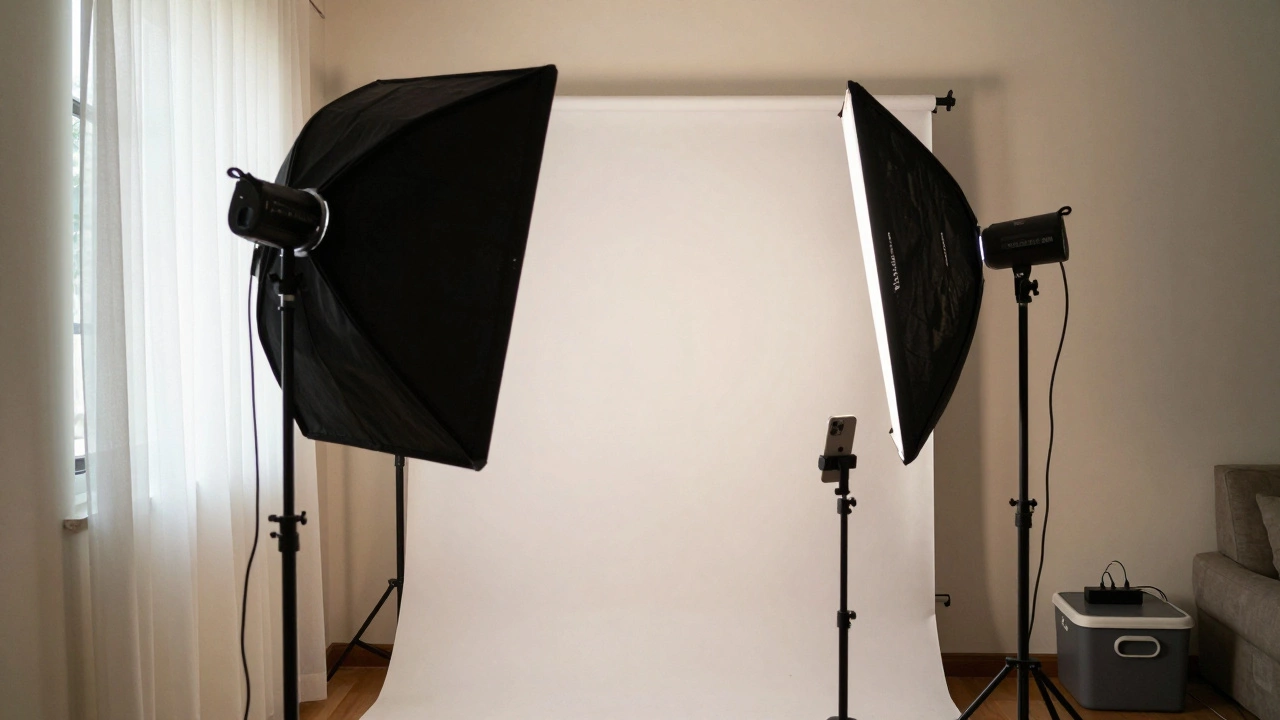
Start with one softbox light. A 24x24 inch LED softbox with adjustable brightness (around 5000K color temperature) costs under ₹4,000 on Amazon India or Flipkart. Mount it on a cheap stand from a local hardware store. Place it at a 45-degree angle to your subject. That’s your key light-the main source of illumination.
Add a reflector on the opposite side. You can buy a 5-in-1 reflector for ₹1,200, or use a piece of white foam board from a stationery shop. It bounces light back softly, reducing harsh shadows. No need for a second light unless you’re shooting full-body portraits or products with complex shapes.
Pro tip: Avoid overhead lighting. It casts shadows under the eyes and nose. Keep your light at eye level or slightly above. Test it by taking a selfie with your phone. If your face looks flat or too dark on one side, move the light.
Backdrops and surfaces
For portraits, white or light gray works best. For product shots, black or dark gray adds drama. You can buy vinyl backdrops online for ₹1,500-₹3,000, or use a roll of matte white paper from a printing shop. Paper rolls are cheaper and easier to replace when they get dirty or wrinkled.
For tabletop shoots (like jewelry, cosmetics, or food), use a smooth surface. A white acrylic sheet from a local plastic supplier costs less than ₹500 and gives a clean, reflective base. Avoid wooden tables-they show grain and shadows. If you must use wood, cover it with a white cloth or vinyl.

Camera and phone setup
You don’t need a DSLR. A modern smartphone with a good rear camera (iPhone 13 or newer, Samsung S22 or newer, Google Pixel 6 or newer) works perfectly. Use manual mode if your camera app allows it. Set ISO to 100, shutter speed to 1/125 or faster, and focus manually on the subject’s eyes.
Use a tripod. A small, adjustable phone tripod costs ₹800-₹1,500. It keeps your shots steady and lets you frame everything precisely. If you’re shooting video, lock your phone’s focus and exposure so the lighting doesn’t flicker between frames.
If you’re using a DSLR or mirrorless camera, a 50mm f/1.8 lens (often called the "nifty fifty") is ideal. It’s cheap (₹8,000-₹10,000), sharp, and gives you that soft background blur professionals love.
Sound and ventilation
If you’re recording voiceovers or videos, background noise is your enemy. In Indian homes, ceiling fans, ACs, traffic, and neighbors can ruin audio. Turn off fans and AC during shoots. Close windows. Record during quieter hours-early morning or late night.
Use your phone’s built-in mic for starters. If you upgrade, get a lavalier mic (like the Rode Wireless GO II or a ₹3,000 USB mic from UGREEN). Plug it into your phone or laptop. Test audio with a 10-second clip. Listen for hums, echoes, or wind noise.
Good airflow matters too. LED lights don’t get hot, but if you’re using older halogen bulbs, they can overheat a small space. Keep a small fan running outside the frame to circulate air. It helps you stay comfortable and prevents sweat from showing on skin during long shoots.
Storage and organization
Keep your gear tidy. A plastic storage box with compartments (₹600-₹1,200) holds your reflectors, cables, batteries, and memory cards. Label everything. You’ll thank yourself when you’re rushing to finish a client’s edit at 11 PM.
Use a power strip with surge protection. Many home studios in India face voltage fluctuations. A good surge protector (₹500-₹800) saves your gear from sudden spikes. Plug your lights, phone charger, and laptop into it.

What to avoid
Don’t use colored walls. Even light blue or yellow walls reflect tint onto your subject’s skin. White is neutral. Always.
Don’t use smartphone flash. It’s harsh, uneven, and creates red-eye or hotspots. Always use diffused light.
Don’t skip testing. Shoot a test image every time you change the light position, backdrop, or subject. Look at the histogram on your camera or phone. If the graph is bunched up on the left, your image is too dark. On the right? Too bright.
Real example: A Mumbai creator’s setup
In Andheri, a freelance makeup artist named Priya runs her Instagram beauty brand from a 4x5 foot corner of her bedroom. Her setup: one 24x24 LED softbox, a white foam board reflector, a white bedsheet backdrop, a phone tripod, and a ₹2,500 USB mic. She shoots at 7 AM before the AC turns on. Her lighting is consistent. Her edits are clean. She gets 50+ DMs a day asking how she does it.
She didn’t spend ₹50,000. She spent ₹12,000 total-and learned how to use what she had.
Final checklist
- ✅ White or neutral background (sheet, paper, or wall)
- ✅ One softbox light (LED, 5000K, adjustable)
- ✅ Reflector (foam board or 5-in-1)
- ✅ Tripod for phone or camera
- ✅ Power strip with surge protection
- ✅ Storage box for small gear
- ✅ Quiet time slot (early morning or night)
- ✅ Test shot before every shoot
You don’t need to be perfect. You need to be consistent. One good photo a day, shot in your home studio, beats ten rushed shots in a rented studio every month. Start small. Keep it simple. Improve slowly.
Can I set up a home studio with just a smartphone?
Yes, absolutely. Modern smartphones have excellent cameras. With good lighting and a white backdrop, you can shoot professional-quality portraits, product photos, and videos. Use manual settings, a tripod, and a softbox light. Many influencers in India started with just a phone and a bedsheet.
How much does a basic home studio cost in India?
You can start with under ₹15,000. A 24x24 LED softbox (₹3,500), a reflector (₹1,200), a phone tripod (₹1,000), a white backdrop (₹1,000), a surge protector (₹600), and a USB mic (₹2,500) will get you going. If you already have a phone and a quiet corner, your only cost is lighting and support gear.
Do I need a dark room for a home studio?
No. You need control over light, not darkness. A room with windows is fine-you just need to block sunlight with blackout curtains, thick bed sheets, or cardboard. Many studios in Mumbai use white curtains over windows to soften natural light during the day and turn off lights at night to avoid glare.
What’s the best time of day to shoot at home?
Early morning (6-8 AM) or late night (8-10 PM) work best. The house is quiet, ACs and fans are off, and you avoid harsh midday sun. In cities like Mumbai, traffic noise drops after 9 PM, making it ideal for audio recording. Avoid noon-light is too strong and unpredictable.
Can I use natural light instead of artificial lights?
Yes, but only if you’re consistent. A north-facing window gives the softest natural light in India. Place your subject parallel to the window, with a reflector on the opposite side. Shoot on cloudy days for even light. But if you need to shoot at night, on weekends, or during monsoon, artificial light is more reliable.